Saturday, September 3, 2016

Power Query: how to connect to Essbase and pull data

UPDATE5: ExoInsight 7.0.0 now makes working with Tableau much easier than before. You can access ExoInsight from inside Tableau!

UPDATE4: ExoInsight also makes working with OLAP data (now both Essbase and Analysis Services) easier in Tableau. Instead of struggling to get your Oracle Essbase data in a format that Tableau prefers, ExoInsight does all this heavy lifting for you. ExoInsight eliminates this challenge by presenting your Essbase data and metadata in a relational format, instantly and on-the-fly, unlocking it for downstream reporting tools such as Tableau. The challenges with Tableau’s built-in Oracle Essbase connector are well documented, not because the connector doesn’t do the job advertised, but because of the inherent discrepancies between OLAP and relational data. Tableau’s internal engine prefers data in row-and-column format, and this concept simply doesn’t apply to OLAP sources such as Oracle Essbase.

Enter ExoInsight. Instead of struggling to get your Oracle Essbase data in a format that Tableau prefers, ExoInsight does all this heavy lifting for you, formatting your Essbase data in such a way that makes it easy to work with.

UPDATE3: ExoInsight enables Power BI Direct Query capability to Essbase. But its data staging ability makes ExoInsight much more useful than as just a PBI connector. ExoInsight allows you to pull Essbase data at any level, including calculated members, into a SQL Server relational, flat format that's perfect for use in downstream processes. Easily schedule SQL Server jobs to have your Essbase data refreshed in ExoInsight. You can also stage Essbase data that doesn't change (last year's budget, for example) in ExoInsight rather than have to make yet another roundtrip to Essbase from Power BI.

UPDATE2: Now you don't even have to know MDX to use the Power BI connector for Essbase. This makes it much more accessible for people who don't know Essbase, but still need to pull live data directly from it, without ETL/data marts/data warehouses and the accompanying lag times.

UPDATE: We've now created a fully-supported Power BI connector for Essbase. It's significantly improved from the raw Power Query Excel workbook below.


As promised in my last post, I'm going to detail the process of connecting Power Query to Essbase and extracting data. Please keep in mind that I'm a Power Query neophyte. I'm sure there are better ways to accomplish some of the steps outlined below. Please post a comment with any advice/improvements, so we can all benefit.

First, let me start by saying that there is no magic involved. It's just rare that anyone on the Essbase side uses the requisite connection method - XMLA. This is likely because Essbase does a terrible job of implementing the XMLA protocol. It only does so partially, and even deviates from the standard in the parts it ostensibly supports. This is the reason why third-party tools are almost always unable to connect to Essbase - and after working with it for over a decade I think this is by design. Anyone coming from the full-featured, beautifully-implemented XMLA on the Microsoft Analysis Services side would naturally be completely stymied. For those used to Essbase, imagine using XMLA to create/modify cubes, measures, members, etc. This has been possible in MSAS since day one. Ok, enough of my Essbase XMLA ranting - for now anyway. On with the show...

The first piece of information you need is the XMLA url for your Essbase server. On my test server (running in VirtualBox) it looks like so: http://192.168.56.101:9000/aps/XMLA. You'll need to replace the 192.168.56.101 with the server's IP address or DNS name where Hyperion Provider Services is installed (this is usually not the same as the Essbase server). The port is 9000, which is standard for compact (i.e. development) installs, but is usually 13080 or 19000 in production installs. You may need to contact your Essbase administrator if none of the above gives you similar output (your version number could obviously be different) when entered in a web browser:


Power Query supports Web queries, which, of course, is what XMLA is (being SOAP). The key, therefore, is knowing the correct SOAP envelope attributes, as well as the Security node's wsse syntax to pass to the Essbase XMLA service. I've highlighted below the items most likely to cause an issue when trying to connect:
Xml.Tables(Web.Contents("http://192.168.56.101:9000/aps/XMLA",
  [
   Headers = [#"Content-Type"="text/xml; charset=utf-8"],
   Content=Text.ToBinary("
    <SOAP-ENV:Envelope xmlns:SOAP-ENV='http://schemas.xmlsoap.org/soap/envelope/'
 xmlns:wsse='http://docs.oasis-open.org/wss/2004/01/oasis-200401-wss-wssecurity-secext-1.0.xsd'
 xmlns:xsd='http://www.w3.org/2001/XMLSchema' xmlns:xsi='http://www.w3.org/2001/XMLSchema-instance'>
 <SOAP-ENV:Header>
   <Security xmlns='wsse'>
     <UsernameToken>
       <Username>admin</Username>
       <Password>password123</Password>
     </UsernameToken>
   </Security>
 </SOAP-ENV:Header>
 <SOAP-ENV:Body>
 <Execute>
 <Command>
   <Statement>
    SELECT NON EMPTY { crossjoin([Year].members, {[Actual]}) } ON COLUMNS, 
      NON EMPTY {crossjoin(Descendants([Profit]), crossjoin(Descendants([South]), [Product].members)) } ON ROWS 
    FROM Sample.Basic WHERE ([Can])
   </Statement>
 </Command>
 <Properties>
   <PropertyList>
     <DataSourceInfo>Essbase;Data Source=epm</DataSourceInfo>
     <Content>SchemaData</Content>
     <Catalog>Sample</Catalog>
     <Format>Multidimensional</Format>
     <AxisFormat>TupleFormat</AxisFormat>
     <Content>SchemaData</Content>
     <Timeout>30000</Timeout>
   </PropertyList>
 </Properties>
 </Execute>
 </SOAP-ENV:Body>
 </SOAP-ENV:Envelope>
  ")
 ]
)),

NOTES: The "Data Source" in the above <DataSourceInfo> element is the name of the Essbase server. The "Catalog" is the Essbase application, which must be the same as the one referenced in the MDX query in the <Statement> element.

Power Query provides excellent XML parsing capabilities. I've always had to use other languages (Java, Scala, JavaScript even) to parse XMLA's SOAP responses, but PQ handles it right out of the box. Navigating an XMLA response is as easy as pointing and clicking: 


XMLA returns data and metadata separately. In the above you can see Axes (metadata) and CellData. The hard part is marrying up the two of them. Specifically, CellData is returned like so:


Each data point has a CellOrdinal, which is not a row or column number. With all things XMLA, I always use the Microsoft documentation, which is orders of magnitude better, and more complete, than Oracle's. Here is the CellOrdinal explanation: "The axis reference for a cell can be calculated based on a CellOrdinal attribute value. Conceptually, cells are numbered in a dataset as if the dataset were a p-dimensional array, where p is the number of axes. Cells are addressed in row-major order." Yep, even that is better than Oracle's explanation, because there is no Essbase documentation at all of CellOrdinals.

The M code is pretty self-explanatory, so I'll let it do the talking below. The part dealing with CellOrdinals starts with the SetColumnNumberstep and goes up to, but doesn't include, MergeAxis0.

let
Source = Xml.Tables(Web.Contents(fnGetParameter("Provider Services URL"),
   [
   Headers = [#"Content-Type"="text/xml; charset=utf-8"],
   Content=Text.ToBinary("
    <SOAP-ENV:Envelope xmlns:SOAP-ENV='http://schemas.xmlsoap.org/soap/envelope/'
 xmlns:wsse='http://docs.oasis-open.org/wss/2004/01/oasis-200401-wss-wssecurity-secext-1.0.xsd'
 xmlns:xsd='http://www.w3.org/2001/XMLSchema' xmlns:xsi='http://www.w3.org/2001/XMLSchema-instance'>
 <SOAP-ENV:Header>
   <Security xmlns='wsse'>
     <UsernameToken>
       <Username>" & fnGetParameter("Username") & "</Username>
       <Password>" & fnGetParameter("Password") & "</Password>
     </UsernameToken>
   </Security>
 </SOAP-ENV:Header>
 <SOAP-ENV:Body>
 <Execute>
 <Command>
   <Statement>
     " & fnGetParameter("MDX Query") & "
   </Statement>
 </Command>
 <Properties>
   <PropertyList>
     <DataSourceInfo>Essbase;Data Source=" & fnGetParameter("Essbase Server") & "</DataSourceInfo>
     <Content>SchemaData</Content>
     <Catalog>" & fnGetParameter("Essbase Application") & "</Catalog>
     <Format>Multidimensional</Format>
     <AxisFormat>TupleFormat</AxisFormat>
     <Content>SchemaData</Content>
     <Timeout>30000</Timeout>
   </PropertyList>
 </Properties>
 </Execute>
 </SOAP-ENV:Body>
 </SOAP-ENV:Envelope>
  ")
 ]
)),
Body = Source{0}[Table],
xmlAnalysis = Body{0}[Table],
ExecuteResponse = xmlAnalysis{0}[Table],
return = ExecuteResponse{0}[Table],
mddataset = return{0}[Table],
root = mddataset{0}[Table],
Axes = root{2}[Table],
Axis = Axes{0}[Table],
AxisTextType = Table.TransformColumnTypes(Axis,{{"Attribute:name", type text}}),
ExpandTuples = Table.ExpandTableColumn(AxisTextType, "Tuples", {"Tuple"}, {"Tuples.Tuple"}),
AxisOrdinalMap = Table.ExpandTableColumn(ExpandTuples, "Tuples.Tuple", {"Member", "Attribute:Ordinal"}, {"Tuples.Tuple.Member", "Tuples.Tuple.Attribute:Ordinal"}),
AddDimensionMembers = Table.AddColumn(AxisOrdinalMap, "DimensionMembers", each Text.Combine([Tuples.Tuple.Member][UName], ",")),
AxesTable = Table.AddColumn(AddDimensionMembers, "DimensionAliases", each Text.Combine([Tuples.Tuple.Member][Caption], ",")),
Axis0 = Table.SelectRows(AxesTable, each ([#"Attribute:name"] = "Axis0")),
Axis1Text = Table.SelectRows(AxesTable, each [#"Attribute:name"] <> "Axis0" and [#"Attribute:name"] <> "SlicerAxis"),
Axis1 = Table.TransformColumnTypes(Axis1Text,{{"Tuples.Tuple.Attribute:Ordinal", type number}}),
SlicerAxisText = Table.SelectRows(AxesTable, each ([#"Attribute:name"] = "SlicerAxis")),
SlicerAxis = Table.TransformColumnTypes(SlicerAxisText,{{"Tuples.Tuple.Attribute:Ordinal", type number}}),
CellData = root{3}[Table],
Cells = Table.ExpandTableColumn(CellData, "Table", {"Value", "FmtValue", "Attribute:CellOrdinal"}, {"Table.Value", "Table.FmtValue", "Table.Attribute:CellOrdinal"}),
#"Changed Type" = Table.TransformColumnTypes(Cells,{{"Table.Attribute:CellOrdinal", type number}}),
SetColumnNumber = Table.AddColumn(#"Changed Type", "Axis0", each Number.Mod([#"Table.Attribute:CellOrdinal"], Table.RowCount(Axis0))),
GroupedRows = Table.Group(SetColumnNumber, {"Axis0"}, {{"ColumnNum", each _, type table}}),
AddedClusteredIndex = Table.TransformColumns(GroupedRows, {"ColumnNum", each Table.AddIndexColumn(_,"ClusteredIndex",0,1)}),
ExpandClusteredColumn = Table.ExpandTableColumn(AddedClusteredIndex, "ColumnNum", {"Table.Value", "Table.Attribute:CellOrdinal", "ClusteredIndex"}, {"ColumnNum.Table.Value", "ColumnNum.Table.Attribute:CellOrdinal", "ColumnNum.ClusteredIndex"}),
#"Sorted Rows" = Table.Sort(ExpandClusteredColumn,{{"ColumnNum.Table.Attribute:CellOrdinal", Order.Ascending}}),
#"Removed Columns1" = Table.RemoveColumns(#"Sorted Rows",{"ColumnNum.Table.Attribute:CellOrdinal"}),
#"Changed Type2" = Table.TransformColumnTypes(#"Removed Columns1",{{"Axis0", type text}}),
MergeAxis0 = Table.NestedJoin(#"Changed Type2",{"Axis0"}, Axis0, {"Tuples.Tuple.Attribute:Ordinal"},"Columns",JoinKind.LeftOuter),
ExpandColumns = Table.ExpandTableColumn(MergeAxis0, "Columns", {"DimensionMembers", "DimensionAliases"}, {"Columns.DimensionMembers", "Columns.DimensionAliases"}),
MergeAxis1 = Table.NestedJoin(ExpandColumns,{"ColumnNum.ClusteredIndex"}, Axis1,{"Tuples.Tuple.Attribute:Ordinal"},"Rows",JoinKind.LeftOuter),
ExpandRows = Table.ExpandTableColumn(MergeAxis1, "Rows", {"DimensionMembers", "DimensionAliases"}, {"Rows.DimensionMembers.1", "Rows.DimensionAliases.1"}),
AddSlicerMemberNames = Table.AddColumn(ExpandRows, "SlicerMemberNames", each SlicerAxis[DimensionMembers]),
ExpandSlicerMemberNames = Table.ExpandListColumn(AddSlicerMemberNames, "SlicerMemberNames"),
AddSlicerMemberAliases = Table.AddColumn(ExpandSlicerMemberNames, "SlicerMemberAliases", each SlicerAxis[DimensionAliases]),
ExpandSlicerMemberAliases = Table.ExpandListColumn(AddSlicerMemberAliases, "SlicerMemberAliases"),
result = Table.RemoveColumns(ExpandSlicerMemberAliases,{"Axis0", "ColumnNum.ClusteredIndex"})
in
    result

The code can handle any combination of dimensions in the ROWS, COLUMNS, or SLICER axes. I haven't tested it with PAGE or CHAPTER, however. Also, it will return the "Default" alias, since XMLA returns this by default - whether you specify it in an axis or not. But if you use dimension properties to pull in other alias tables or dimension information (like LEVEL_NUMBER or GEN_NUMBER), you will need to modify the AxesTable step from [Caption] to the property name. 

The fnGetParameter query referenced above was taken verbatim from Ken Puls awesome Excelguru blog. It allows you to store variables and their values in an Excel sheet, then reference them from Power Query.

The code above generates the following output to Excel:


Finally, I've included a workbook containing all of the above that you can download here. Please let me know if you have suggestions for how to make the code better. I am astounded by how easy Power Query has made working with XMLA. At any step in the process above you can easily see what Power Query is doing. I will definitely be using PQ as my go-to Extract and Transform (of ETL) in the future.

Saturday, August 27, 2016

My first foray into Power Query

UPDATE: We've now created a fully-supported Power BI connector for Essbase. It's significantly improved from the raw Power Query Excel workbook below.

I'm not a big fan of FDMEE (that's putting it mildly), so when I recently had a requirement to pull data from one Essbase cube and map the data for loading to another Essbase cube, I started looking elsewhere. Since I happen to be using Excel 2016, it was a logical place to start.

It turns out that Microsoft has incorporated Power Query directly into this version of Excel, whereas before it was an add-in that you had to download and install separately, similar to Smart View. Except, since it's an add-in directly from Microsoft it works a thousand times better than Oracle's. This is understandable, considering Microsoft wrote Excel and can modify the code as needed to make its own add-ins work correctly.

Anyway, Power Query functionality can now be found under the Data tab in Excel 2016. Below you can see some of the data sources from which Power Query can pull. Besides the "other sources" shown below, it can pull from any relational database (and Microsoft's OLAP Analysis Services, too, of course). You will not, however, see Essbase as an explicit data source. In fact, people have been requesting that Microsoft add Essbase for almost 2 years now.


This didn't seem very encouraging at first. But hey, I built a rudimentary Google Sheets Essbase add-on, as well as a stand-alone, web-based Essbase grid system (cubeSavvy). How hard could it be to get Power Query talking to Essbase?

Well, it turned out to be pretty easy. So easy, in fact, that I am now a huge fan of Power Query. If Power Pivot is as awesome at BI as Power Query is at ETL, I will definitely be checking it out soon!

Power Query does have limitations, but it is orders of magnitude faster than FDMEE within them. For example, just mapping the 250,000 rows from one cube (not including extracting them) took FDMEE over 15 minutes. Power Query extracted the same data from Essbase and mapped it in a little over a minute!

I'm not sure how much FDMEE costs, but it's probably in the hundred of thousands of dollars like most Oracle products. Do you know how much Power Query costs? Zero dollars!!! It's built directly into Excel, so you get it for a couple of hundred bucks - along with Power Point, Word, Access, Outlook, and the other Office products.

I'm going to write a separate post with the detailed instructions for how to pull Essbase data into Power Query, since I anticipate a lot of people who aren't interested in FDMEE will want to reference it. The sharp-eyed among you will have noticed, however, that the screenshot above contains data from Sample.Basic returned from an Essbase query.

Thursday, August 18, 2016

Russian installer

Почти половина посетителей этой страницы приходится на Россию. Получается конечно, что они уже умеют читать по-английски. Но кому не удобнее на своем родном языке?

Я давно начал переводить cubeSavvy на русский, но далеко не весь текст был переведён. Однако в этой последней версии (6.0.1) дела куда лучше обстоят с переводом. Практически всё на русском, так в самом cubeSavvy, как в инсталляционной программе.

Последную версию, как всегда, можно загрузить здесь.

И так, быстро пройдёмся по всем окнам инсталляционной программы. Начнём с самого начала - выбор языка:


Если выбрать Russian:


Настоятельно рекомендую выбрать каталог, в котором нет пробелов, а то программа может не запуститься:


Sunday, August 14, 2016

More about new features in production release

There are several new features that I'd like to call attention to in the production release. One of the most important, even though it's not visible to end users, is the installer's ability to create a Windows service. Previously, the only way to run cubeSavvy on Windows was to use the start.bat file. While very easy to use and understand, it had a major shortcoming - the DOS command window remained open as long as cubeSavvy was running. The window could easily be closed accidentally, ending the cubeSavvy session in the process. Also, it's just not a good practice from a system administration point of view to have open DOS windows for each process running on a server. The Windows service allows for stopping and starting cubeSavvy just as you would any other service.

cubeSavvy running as a Windows service
The next new feature of note is the ability to share ad-hoc grids with other cubeSavvy users. Administrators have always had this capability, using the "Users" - "Edit User Access" button of the "Home" tab. Now regular users can also share the grids they create. This is key: users can only share those grids that they themselves create. For such grids they have the option of giving fellow users either "Read/View" access or "Full Access". As the name implies, read access means that the grid appears in the user's list of grids on the left. The user can then open the grid, refreshing the retrieval contained therein. They can even modify the retrieval on the grid while they have it open, however, they do not have the ability to save their changes and make them visible to other users. Users with "Read" access to a grid are also not authorized to share it with other users. Only the creator of the grid, and admins, have this level of authorization.

share grid screen

An "Insert Attributes" button has also been introduced. Clicking this button will add those attribute dimensions to the grid that are not already present. For example, using an ad-hoc grid based on Sample.Basic, if the retrieval already contains "Caffeinated_True"; "Ounces", "Pkg Type", "Population", and "Intro Date" will be added to the header row. If no attribute dimensions are currently present, they will all be added.

insert attributes button

The last enhancement is the "Environment" button, also for ad-hoc grids (are you seeing a trend here? ;-)). Clicking on this button presents a slide-out panel on the right of the grid. This panel displays most of the information available when creating or editing a grid: Environment, Application, Database, Calc script, Shared Services Groups, Comments, Description, and Decimal Places. A user with read access will see these options all grayed out, but can at least see the main settings for the grid. An admin user, the grid's creator, or a user with "Full Access" will be able to edit these fields and save the changes.

environment slide-out panel on grid

Give cubeSavvy a try. It has a 30-day free trial, so you have nothing to lose!

If you have any questions, please let me know in the comments.
Regards,
Harry

Sunday, July 31, 2016

Announcing the first cubeSavvy production release

I’m proud to announce the official production release of cubeSavvy 6.0.0. Almost four months in beta status has resulted in a battle-hardened, reliable product. I’d like to thank everyone who tested and provided feedback and/or suggestions. It was a tremendous help and I couldn’t have done it without you!
As I mentioned at Kscope, I will be charging a licensing fee for cubeSavvy. I know this goes somewhat against the grain in the Oracle EPM space, where free third-party tools abound. In fact, I myself offer the freely-available cubeSavvy Utilities on this website. So why then am I not making cubeSavvy available at no cost? The answer is simple – it’s the only way to determine if it actually provides value to users.
With that in mind, here is the value proposition for cubeSavvy as I see it:
  • Web-based. This gives it several inherent advantages over traditional client-server products:
    • No need to install on every user’s computer, with all the administrative and technical problems that inevitably entails.
    • Works on Windows, Mac OS, Linux, UNIX, as well as iOS and Android.
    • NONE of the Excel add-in issues inherent in the classic add-in and Smart View, such as:
      • Multiple instances of Excel preventing it from loading.
      • All manner of registry issues around DLLs.
      • Missing Excel menu item.
      • Inability to handle large queries. Smart View uses compression, but it’s compressing XML which is already a large, bloated data-transmission format. cubeSavvy is much more efficient.
      • Inexplicable Excel crashes. Oracle blames them on Microsoft, who in turn blames them on Oracle.
  • You get the best parts of Planning functionality: fixed forms, focused calculations, monitoring of user data input, etc. All without having to deal with Planning’s confusing architecture and tools and the administration nightmares they create. cubeSavvy allows you to just use Essbase without having to deal with Planning’s headaches.
  • Price. Save your organization hundreds of thousands, if not millions, of dollars. Oracle’s listed price for “Planning Plus” is $4,270 per user per year with a minimum of 25 users. That comes out to $106,750, minimum. Compare that to cubeSavvy, which would cost around $3,000 for the same number of users for the first year (and less than $2,000 for subsequent years) – and has no minimum number of users. Your organization is already spending a fortune on Essbase. Make the most of that investment!
  • Speed. Most users have reported retrievals are faster than Smart View. Some have even noticed speeds faster than the classic add-in!
  • Sharing. cubeSavvy allows users to create ad-hoc grids and share them with other users. No more emailing Excel retrieves or saving them to shared drives.
  • Faster development and support. We all have our horror stories with Oracle Support. Many people at Kscope even mentioned that they’ve completely stopped logging SRs, seeing it as an exercise in futility. Being a smaller, more agile company with a more compact, better-architected product allows for much faster response times. For example, during beta testing it wasn’t unusual to turn around major feature requests in less than a week. Bugs were squashed in mere hours, not quarters.
You can download cubeSavvy at the usual place. Try it out for a month with up to 10 users. Why not give it a test-drive given the above value it could bring to your organization?
If you have any questions or comments, please let me know.
Thanks,
Harry
harry.gates@cubeSavvy.com

Thursday, July 28, 2016

cubeSavvy web-based Essbase grids: beta 9.7 – Windows service

This beta release contains no changes to core cubeSavvy functionality. Rather, the installer received a major improvement in preparation for the upcoming production release. Now, when installing on Windows, a cubeSavvy service is automatically created. cubeSavvy can then be stopped and started like any other Windows service:

Please give it a whirl and let me know what you think.

As there have been no new reported issues (and all the others have been addressed), I’m currently planning on launching the production release by this Monday, August 1st. Look for several blog posts/videos in the coming days.

Sunday, July 24, 2016

cubeSavvy web-based Essbase grids: beta 9.6 – add attribute dimensions

I’ve been on vacation for the past 2 weeks, hence the lack of development/posts. I have had time, however, in the day since I’ve been back to add a requested feature – the ability to add attribute dimensions to an ad-hoc grid. Intuitively, only attribute dimensions that are not currently on the grid will be added.

Here you can see an ad-hoc grid that doesn’t contain attribute dimensions, along with the new “Insert Attributes” button on the toolbar:

After clicking “Insert Attributes”:

Even those of you who aren’t interested in this feature will want to download this last release, since the license file in the prior version has expired and will no longer allow you to use the program.

The production release of cubeSavvy is still on-target for August. This is primarily due to the ongoing positive feedback received from beta testers, including in-person at Kscope in Chicago a few weeks ago. I really appreciate it, so please keep your comments and suggestions coming!

Saturday, June 18, 2016

cubeSavvy web-based Essbase grids: beta 9.5 – users can now create & share ad-hoc

version 6.0.0 BETA 9.5

Enhancements and improvements in this release and BETA 9.
  • Added ability for users to create ad-hoc grids.
    • Users no longer need to wait for an admin to create an ad-hoc grid for them. They can do so directly from the Home tab, using the 'New Adhoc grid' option.
    • Users can also edit and delete ad-hoc grids to which they have access.
  • Improvements made to Environments management when creating/editing grids.
  • Now only grids to which users have access are displayed in the Grids list on the left. As a reminder, there are three ways a user can have access to a grid:
    1. Through direct access given by an admin on the Users tab
    2. Through membership in a Shared Services group that has been assigned to a grid by an admin
    3. Through creating an ad-hoc grid themselves using the new functionality above
  • Added ability for users to share ad-hoc grids with other cubeSavvy users. I'm finally getting to some of the features I've been looking forward to creating since I started this project. Most of the features till this release have been recreating (and improving) functionality that Smart View already has. However, this ability to collaborate by sharing grids is something that you can't easily do in Excel, and hence in Smart View.

cubeSavvy will remain in beta for a little while longer to make sure that it's as stable and fast as possible. I'm tentatively targeting August for the 6.0.0 production release.

I'll be at KScope in Chicago in a couple of weeks. Please find me and say hi!

Sunday, June 5, 2016

cubeSavvy web-based Essbase grids: beta 8 – run calc scripts on ad-hoc submit data

Enhancements in this release:

Ability to run calc scripts on ad-hoc grids after Submit Data.

This functionality is the same as for MDX and Report Script grids: all the members for each dimension are passed to the report script, allowing for super-focused calculations/aggregations. Click on FAQ on the Home tab for more details, and an example.

I'll walk through a simple example.

First, select a calc script:
edit grid to select adhoc calc script

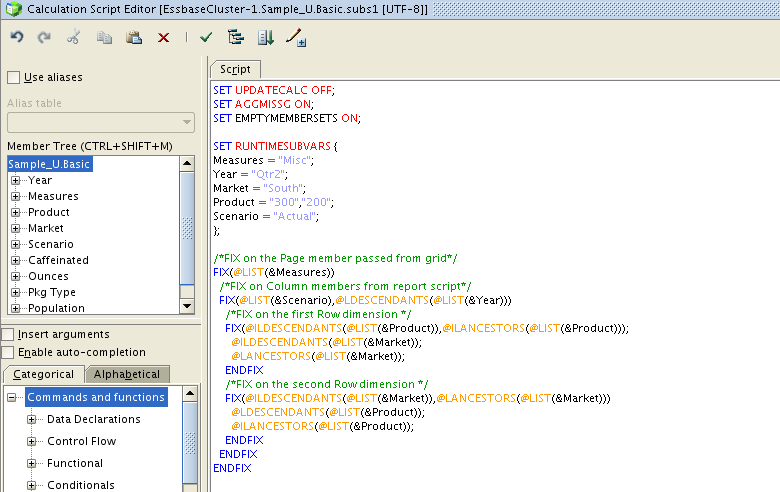
The "subs1" calc script above:
subs1 calc script attached to adhoc grid
Note the use of @IL and @L member selection commands. These take a @LIST (since there can be multiple members), which is passed in from the cubeSavvy grid on submit.

Data has been entered in an ad-hoc grid below, but has not yet been submitted (Submit Data).
entered data in grid but not submitted

After clicking Submit Data on the grid above, we can see that data has been aggregated:
calculated data after submit on adhoc grid

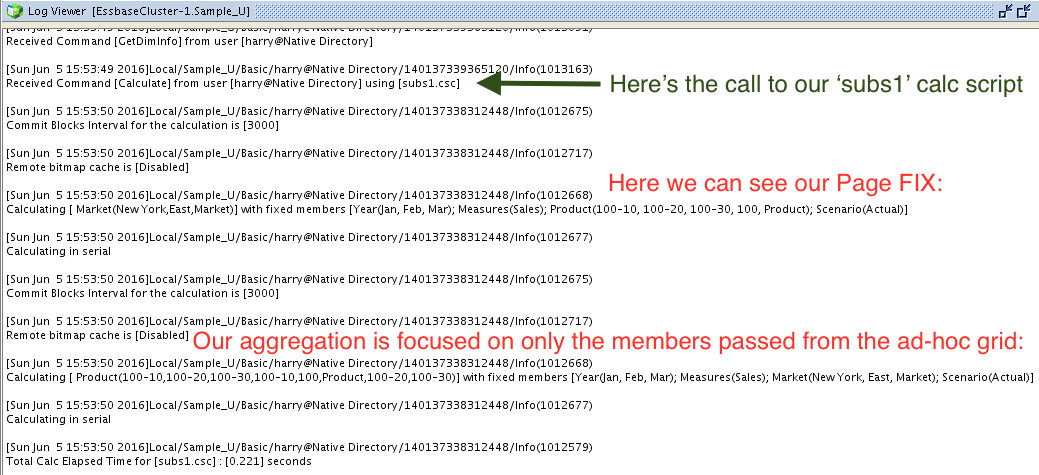
The Essbase log for our application (Sample_U.Basic) gives us the full details:
Sample_U.Basic log file showing our focused calc from adhoc grid

And we can get detail that the Essbase log fails to provide by looking at the "Data Updates" tab on the cubeSavvy Home page. Here we can see the full Member Intersection, along with the Old Value and New Value for each data point:
Data Submits screen showing submitted data and calc script run


Added Dataless Navigation


Improved administration of multiple Essbase environments

  • It's now much easier to add/edit/delete Essbase environments, directly from the Home page
  • The "default_configuration" below is the one set up in the installer. You can edit or delete it as you would any other environment. However, there must always be at least one environment. If you delete them all, the "default_configuration" will be added back the next time you start (start.bat/start.sh) the application.new environments management screen


I've decided to keep cubeSavvy in beta for a little while longer to make sure that it's as stable and fast as possible. Your feedback is still shaping the product. Please keep it coming! Download it here.

Sunday, May 29, 2016

cubeSavvy web-based Essbase grids: beta 7 - multiple Essbase environments

There are several small bug fixes and enhancements in this release. The major enhancement is the ability to add multiple Essbase environments for ad-hoc grids. Prior releases only allowed connecting to a single Essbase server/Provider services combination. That limitation has now been lifted.
  • Here's an excerpt from the cubeSavvy.conf file: The 'default' environment below is used to test whether a user has Essbase access to even log into cubeSavvy. The user should be provisioned in its Shared Services instance. The names are important (e.g. dev, test, main) since this will be displayed on grids. You can add as many environments as needed. At least one, however, is required as the default.
cubeSavvy.esbEnvironments {
default: prod,
dev {esbServer = "epmDev", esbProviderUrl = "http://192.168.56.101:9000/aps/JAPI"},
test {esbServer = "epmTest", esbProviderUrl = "http://192.168.56.102:9000/aps/JAPI"},
prod {esbServer = "epmProd", esbProviderUrl = "http://192.168.56.103:9000/aps/JAPI"}
}
  • By default the installer will prompt for, and fill in, the "main" environment values, like so:
cubeSavvy.esbEnvironments {
default: main,
main {esbServer = "epmMain", esbProviderUrl = "http://192.168.56.103:9000/aps/JAPI"}
}

To add additional environments, as above, you will need to manually edit the $INSTALL_DIR/cubeSavvy/conf/cubeSavvy.conf file.

This enhancement was requested by so many people, I decided to release one more beta to incorporate it.

Grid edit/setup:
environment now on grid edit tab

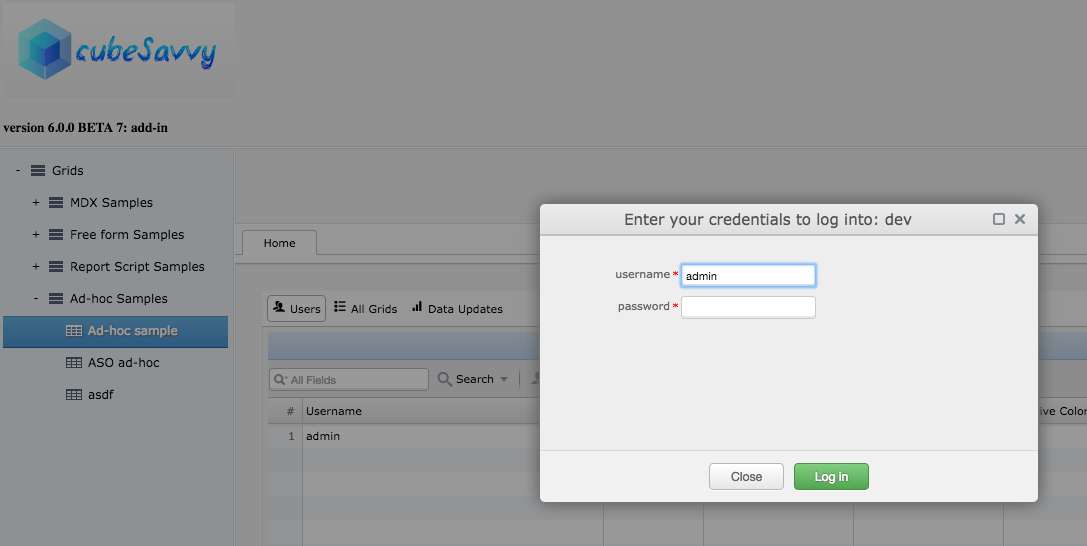
Prompt to log into environment when clicking on grid (only displays if you're not already logged into the particular environment):
environment login prompt

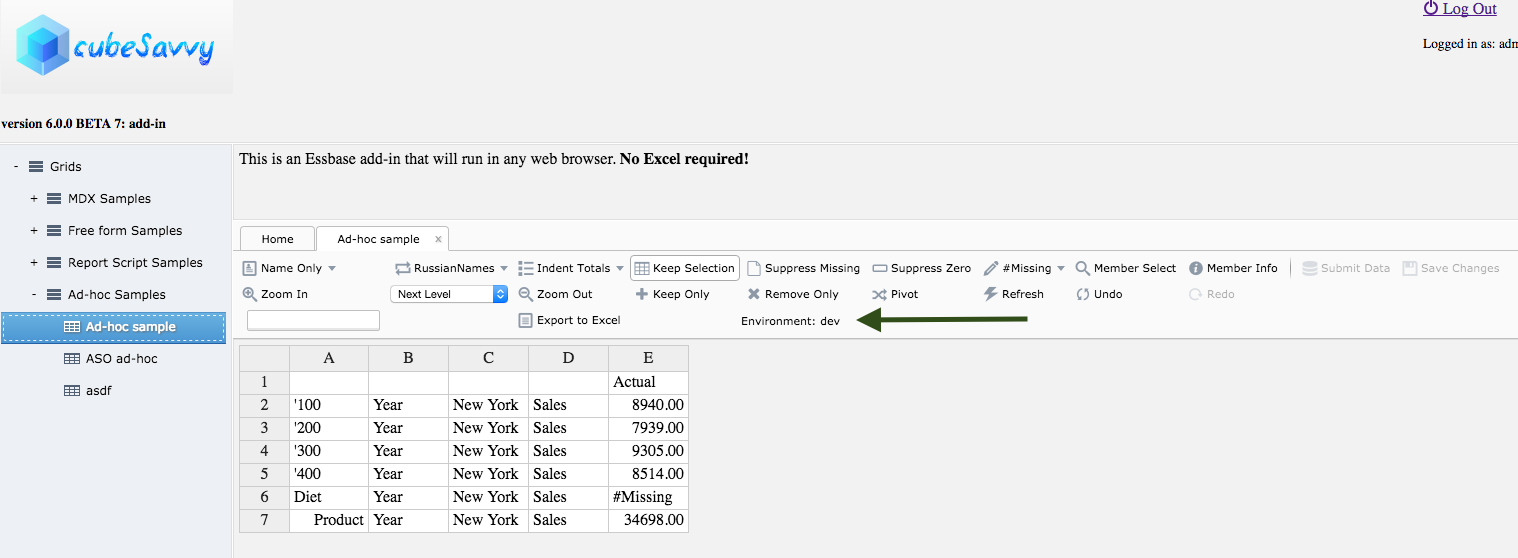
Environment indicated on ad-hoc grid:
environment indicator on grid

Sunday, May 8, 2016

cubeSavvy web-based Essbase grids: Beta 4 – more options

The following features were implemented for Beta 4:
  • Undo/Redo. In theory, the number of these operations is unlimited. In practice, browser memory is the limiting factor.
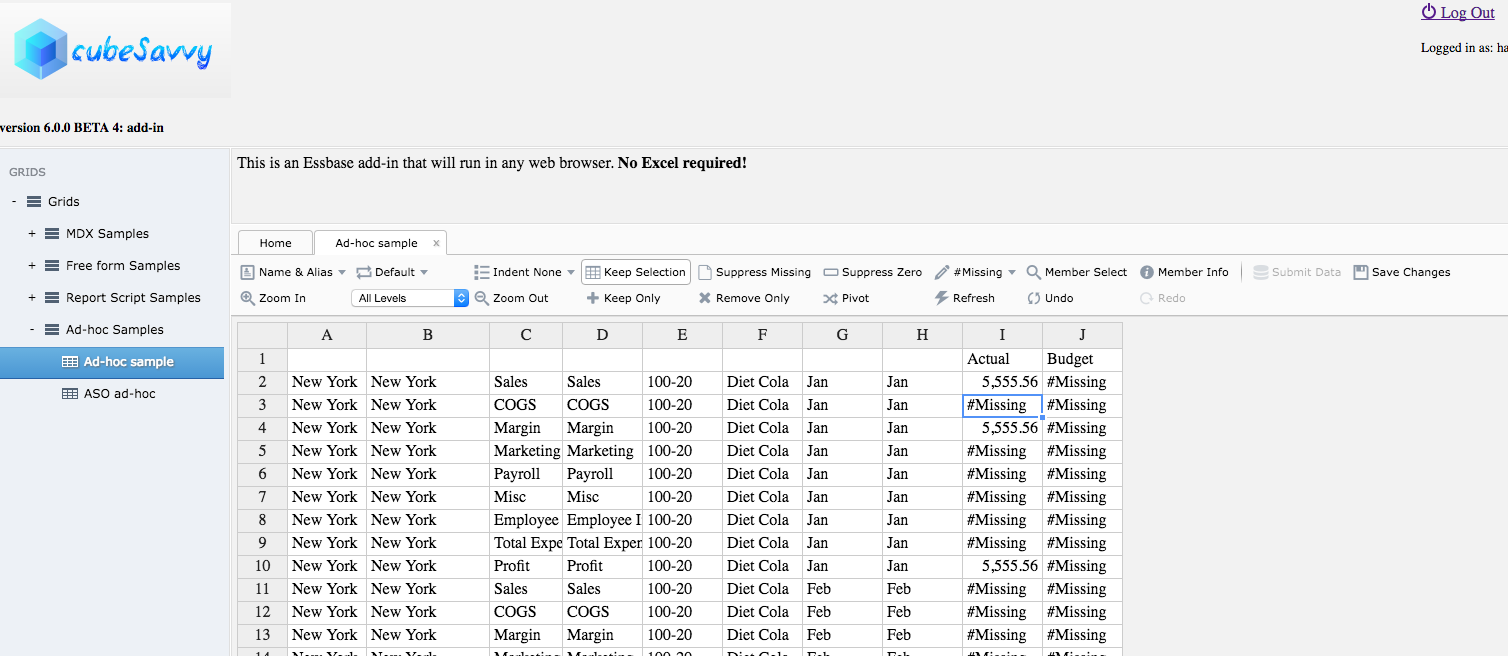
  • Display both member names and aliases on retrieves. The alias displayed is determined by the selection in the dropdown next to "Name & Alias", "Default" in this case.
member names and aliases in retrieve
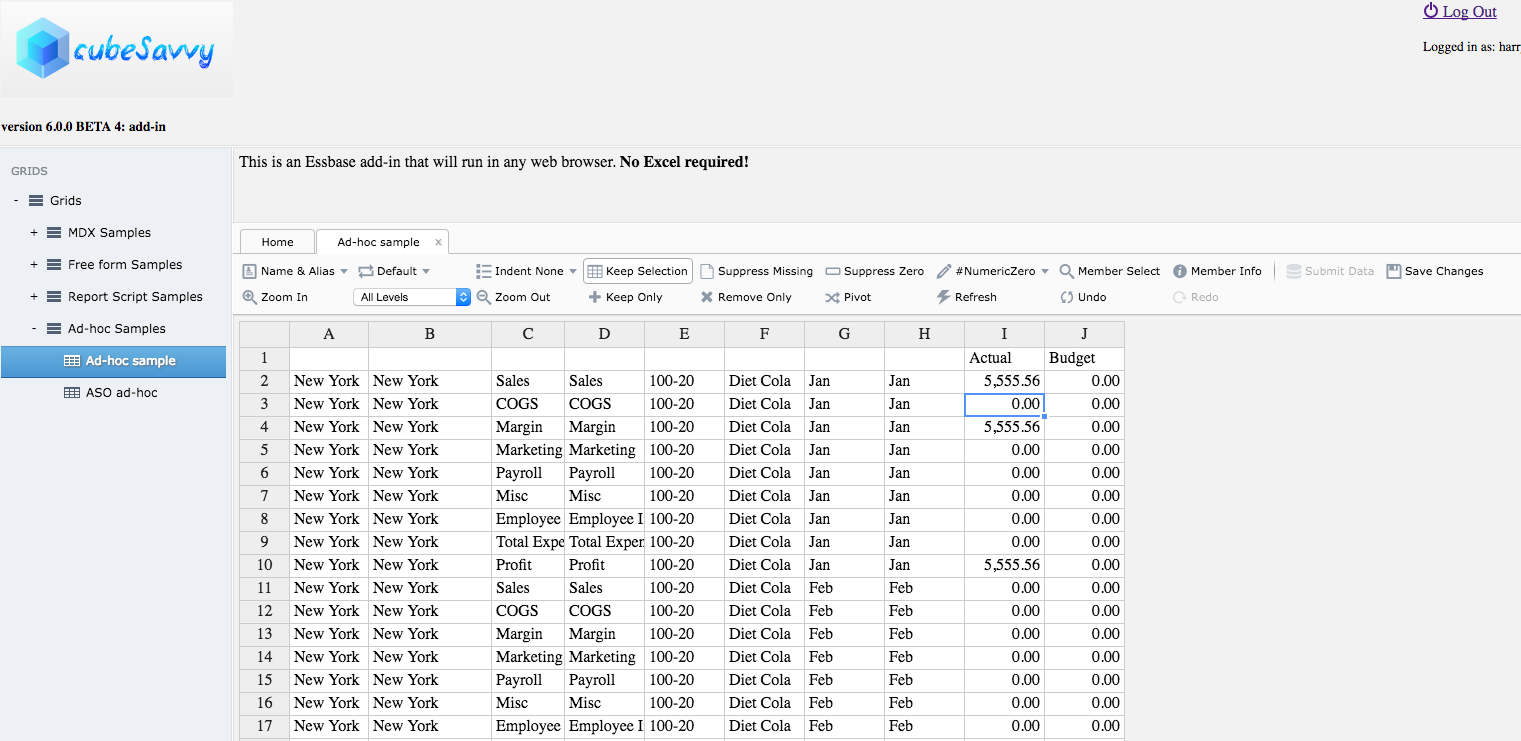
  • Choose #Missing text label or numeric value. The retrieve above with #NumericZero selected:
numeric zero instead of #Missing
  • Select indentation level: subitems, totals, or none. The retrieves above have "Indent None" applied. Previously, all retrieves used "Indent Subitems" exclusively. That remains the default, just as in the classic add-in and Smart View.
Please continue to provide your feedback. It really does let me know what I should work on next. So download Beta 4 and let me know what you think.
-Harry

Saturday, April 30, 2016

cubeSavvy web-based Essbase grids: Beta 3 - double clicks

version 6.0.0 BETA 3 Highlights
  • Implemented mouse actions, such as control button+double-clicking to zoom in and control+right double-clicking to zoom out. You have to press the control button (Ctrl on Windows) while double-clicking. This is necessary because plain double-clicking on a cell opens it for editing.
  • The first iteration of member information and member selection has also been included for testing.
  • Licensing. There is now a license.sec file under the conf directory. This file must be present, and valid, for cubeSavvy to start. For the beta, it allows 30 days of use for up to 10 users.
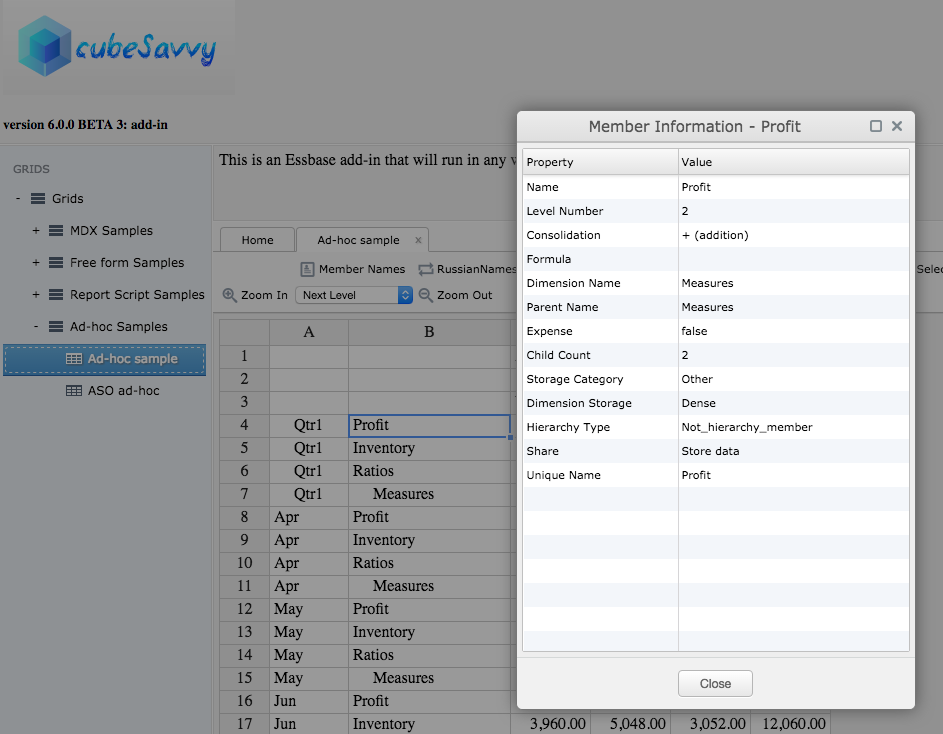
cubeSavvy double click adhoc operationsThe member information screen is pretty similar to the ones in the classic add-in and Smart View:
member information screenThe member selection screen is still a work-in-progress, but is functional. For example, the Search field currently only finds matches for members that are already displayed. It doesn't yet go back and search the database for other potential members that also match the entered criteria. That will be included in the next beta release. You might also wonder why the Alias column is showing Russian below. That is because the alias table chosen on the grid is RussianNames - you can see it in the background:
member selection screenSince I've now implemented the licensing functionality, I've decided to open up the beta to everyone. Therefore, I've made the beta 3 version the main cubeSavvy download.

Please let me know what you think in the comments.

-Harry

Friday, April 22, 2016

cubeSavvy add-in: beta update - Submit Data implemented

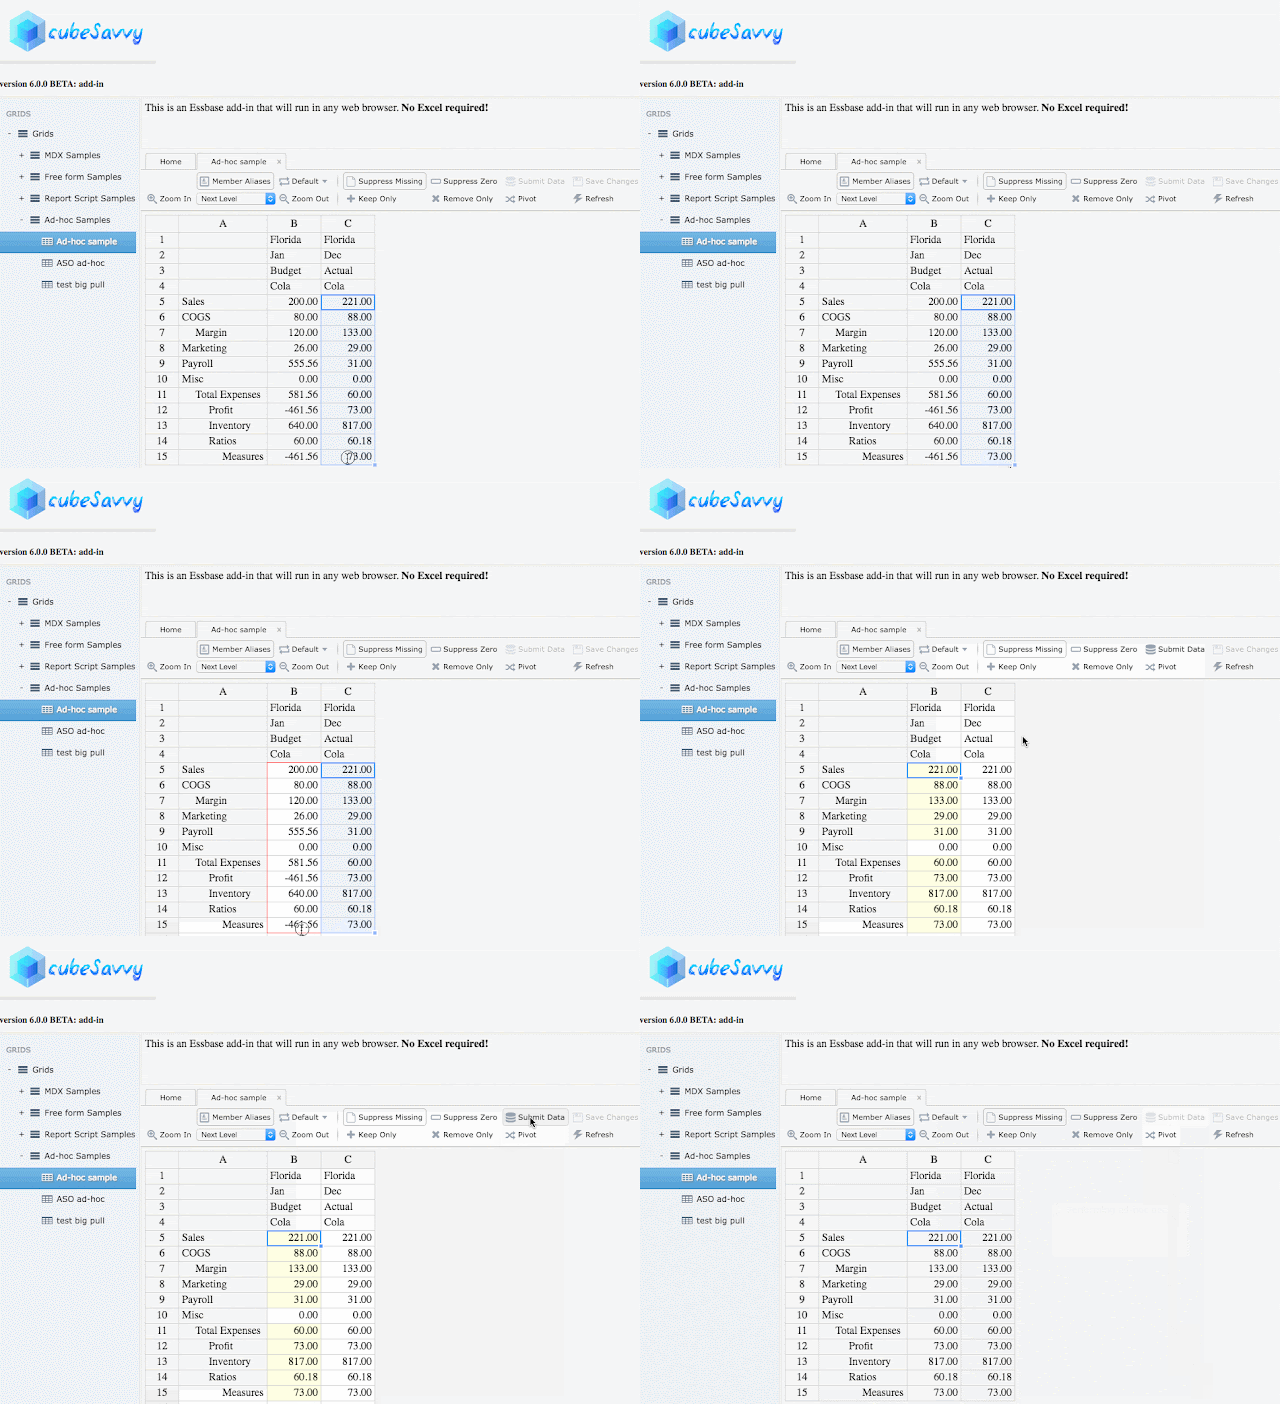
I've implemented Submit Data functionality for the second beta version, to be released tomorrow.

cubeSavvy add-in Submit Data functionality implemented


It also incorporates the feedback I've received from the current beta testers. The most common item mentioned has been to increase the number of rows in a retrieve from the current 20,000 limitation. I'm glad to announce that there is no limit now, besides the one imposed by Provider Services. And, in keeping with my focus on speed, performance is excellent, exceeding that of both Smart View and the classic add-in for large retrieves.

I've also finished perfecting the Save Changes option, to allow changes made to the grid during ad-hoc retrieval operations to be saved:


If you'd like to test the beta, please let me know and I'll make it available to you. I'll be sending out an update to the current beta testers tomorrow.

Thursday, April 14, 2016

cubeSavvy - add-in: beta this weekend

Just a short post, since I'm currently spending all of my limited free time working on development.

I'm shooting for releasing the first beta version of the cubeSavvy web-based Essbase add-in to testers this weekend. As a reminder, this version will only have retrieval capability. Ability to save data will come in the next beta release. Speed has been the major focus, and compares favorably to Smart View, and in some cases exceeds that of the classic add-in.

Please send me an email if you'd like to help test.

In the meantime, here's another brief video demonstrating basic functionality:


Sunday, April 3, 2016

cubeSavvy - the big one

Yes, this has been the plan all along: I'm creating a web-based Essbase add-in. My first attempt was the ill-fated Google Sheets Essbase add-on. I say this not because it was somehow technically-inferior. But because IT Information Security departments across the planet had a collective heart attack at the mere thought of poking a hole in the corporate firewall for Google traffic. Even though many of them had already done the same thing for Oracle XYZ Cloud Service.

cubeSavvy avoids this problem completely, by running inside the corporate firewall. In the latest, de rigueur terminology, it is an internal/private/corporate cloud application.
cubeSavvy allows users to retrieve Essbase data from any browser, on any platform (Windows, Mac, Linux, Unix), without having to install anything on their computer. No Excel, no DLLs, XLAs, .Net. Nada. Although it doesn't require Excel, data can easily be copied and pasted to/from it.

Users can also save their retrieves and administrators can make them visible to other users. This captures the primary functionality that drew me to Google Sheets - the ability to share Essbase data pulls.

As you can see in the short video below, the basic functionality is already working. Additional functionality like member selection, member information, pivot, zooming in to various levels/generations, etc. will be added next. Afterwards, the ability to save (i.e. lock & send) data will be implemented. One of the final steps will be to support mouse functions, like double-clicking and right-clicking.
cubeSavvy Essbase add-in
This version is not yet available for download, but will be coming within the next couple of weeks. Please send me an email if you'd like to participate in the beta program.

As the Grids structure in the video above shows, cubeSavvy already has the ability to create web-based grids using MDX queries and Report scripts. These grids can then be provisioned to users either with Shared Services groups or on a by-user basis:
user grid access screen
Grids can also have Page member drop-downs to allow one grid to be used for entering data to multiple member combinations:cubeSavvy_2_2

MDX and Report grids already have the ability to submit data. All data submissions, including the old value and new value, are also logged and reportable:
data_updates


Sunday, March 13, 2016

cubeSavvy Utilities 5.0 - multiple configuration files

Following are the bug fixes and enhancements released in version 5.0:

  • Bug Fixes
    • MDX
      • Saving the results of an MDX query to a file resulting in the string “null” in empty cells. This has been corrected.
      • Some unicode characters were incorrectly represented when saving the results of an MDX query to a file.
  • Enhancements
    • UI elements on each tab are now grouped by File Inputs (which do not require an Essbase connection) and Essbase Inputs.
    • Reverted back to the platform-specific look-and-feel, because several users sent me comments that the Java one was bugly.
    • Added the ability to choose which Alias table (or “All”) should be exported in the Essbase Inputs section of the Outline XML Parser tab. Previously only the default alias table was exported.
    • Ability to specify different configuration files (by far the most-requested feature).
      • As before, the cubeSavvyUtilities.conf file must reside in the config subdirectory of the cubeSavvyUtilities installation. 
      • An alternate conf file can now be specified, which can be located anywhere. 
        • An example from the new cubeSavvyUtilities.bat in the INSTALL_DIRECTORY: java -jar cubeSavvyUtilities.jar ./config/test.conf aso
      • The INSTALL_DIRECTORY/config/cubeSavvyUtilities.conf file will be used if no other conf file is specified.


The cubeSavvyUtilities.bat referenced above also provides a reference of how to do error-checking after each call is made. The full contents are below for reference:

@echo off
REM first check if Java available on system. exit if not
call :ProgInPath java.exe
if "%PROG%" == "" (
echo Java.exe not found in PATH
exit /b 1
)
REM The 3-character codes to pass into the jar file are as follows:
REM code conf file code GUI tab
REM ---- -------------- -------
REM aso ASOExportParser ASO Export Parser
REM out OutlineParser Outline XML Parser
REM mdx MDXQuery MDX Query
REM fil FileFilter File Filter
REM xml XMLOutlineEdit Outline XML Edit
REM Using the default configuration file, INSTALL_DIRECTORY/config/cubeSavvyUtilities.conf:
java -jar cubeSavvyUtilities.jar out
call :checkErrors
REM Specifying an alternate configuration file (the file doesn't have to reside under the
REM config directory):
java -jar cubeSavvyUtilities.jar ./config/test.conf aso
call :checkErrors

:ProgInPath
set PROG=%~$PATH:1
goto :eof
:checkErrors
IF %ERRORLEVEL% NEQ 0 (
  REM do something here to address the error. uncomment out 'exit' below to stop after first error
  echo we got a problem here: %ERRORLEVEL%
  REM exit 1
)


As usual, you can download cubeSavvy Utilities here.